Duplikaten Management
I am text block. Click edit button to change this text. Lorem ipsum dolor sit amet, consectetur adipiscing elit. Ut elit tellus, luctus nec ullamcorper mattis, pulvinar dapibus leo.
Kategorien
Quick Start
Installing Duplicate Manager
ref: How to Install the Apps from the Microsoft AppSource to your Dataverse Environment?
Duplicate Manager can be easily installed via Microsoft AppSource.
Pre-Requisites:
- A valid Power Apps/Dynamics 365 License
- A valid Power Automate License
- A target environment of type Production or Sandbox
- The system administrator role
Installation:
- Visit the Duplicate Manager Appsource Page. (INSERT LINK)
- Click Get it now.
- You will be redirected to the Power Platform Admin Center.
- In the confirmation interface:
- Select your desired environment
- Review and agree to the terms and conditions.
- Click Install to start the installation.
- The app will install in the background. You can monitor the installation progress in the Status column.
Uninstalling Duplicate Manager
To fully uninstall Duplicate Manager from your environment without leaving behind any traces, please follow the steps below carefully.
Delete all Entity Configurations
Before removing the solution from your environment:
- Open Duplicate Manager and navigate to Entity Configuration.
- For each configured entity, repeat the following:
- Select the entity from the Entity Select dropdown.
- Go to the Advanced tab.
- Click Delete Entity Configuration and confirm the action.
Remove the Solutions from your Environment
Duplicate Manager includes four solutions: Three managed and one unmanaged. To remove them:
- Go to the Power Apps Maker Portal and select your environment.
- In the sidebar, navigate to Solutions.
- Under the Unmanaged tab:
- Find Duplicate Manager Helper.
- Click the three dots (…), choose Delete, and confirm.
- Under the Managed tab, delete the following solutions in this order:
- Duplicate Manager Fonts
- Duplicate Manager Merge
- Duplicate Manager
Configure your environment
Before you can start detecting and managing duplicates, you need to complete a few quick configuration steps. These ensure that your Dataverse environment and apps are set up to use Duplicate Manager as efficiently and effectively as possible.
Disable the built in Dataverse duplicate detection
To avoid conflicts and ensure Duplicate Manager operates as intended, you need to disable the built-in Dataverse duplicate detection:
- Sign in to the Power Platform admin center.
- In the navigation pane, select Manage.
- In the Manage pane, select Einvornments.
- On the Environments page, select an environment.
- In the command bar, select Settings.
- Expand Data management, and then select Duplicate detection settings.
- Uncheck the Enable duplicate detection setting.
- Click Ok to save your changes.
Enable plugin trace logging
Depending on whether your environment is running the new or legacy settings experience, refer to the appropriate instructions provided below.
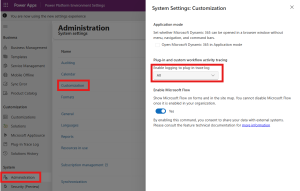
Power Platform Environment Settings App
- Under the System section, select Administration.
- On the Administration page, click on Customization.
- Under Plug-in and custom workflow activity tracing, set Enable logging to plug-in trace log to All.
- Save your changes by clicking Save.
Legacy Environment Settings
In the header bar, select Settings.

- Under the System section, select Administration.
- On the Administration page, navigate to System Settings.
- Go to the Customization tab.
- Under Plug-in and custom workflow activity tracing, set Enable logging to plug-in trace log to All.
- Click Ok to save your changes.
Power App Configurations
To enable full duplicate prevention functionality within forms — including alerting users about potential duplicates, displaying duplicates directly inside the form, and blocking duplicate record creation — you need to configure the following settings in every app that uses forms for entities you want to use Duplicate Manager for.
Enable the async onsave handler
To enable the async save handler:
- Open any app in your environment.
- In the top-left header, click the app’s name.
- A popup will appear to select an app.
- Find the app you want to configure and click the three dots (…) next to the app and select Open in App Designer.
- In the App Designer view, open the Settings and select Features.
- Search for “Async save handler“.
- Enable the feature, then click Save to close the popup.
- Finally, click Save and Publish in the header.
Assign Security Roles
Duplicate Manager provides two pre-defined security roles:
- Duplicate Manager Admin
Grants access to the Duplicate Manager Power App, allowing the user to:
-
- Create and modify entity configurations.
- Start Jobs and view their results.
- Manage the ignored records list.
- Manage the app license.
- Duplicate Manager User
Does not provide access to the Duplicate Manager Power App itself, but it allows the user to fully use its functionalities within forms, including:- Use rules to detect duplicates.
- View the duplicates of the currently opened record.
- Open, ignore, delete or merge the duplicates.
Required permissions
For each entity configured in Duplicate Manager, users must have the following permissions:
- Read permissions to detect and view duplicate records.
- Read, Write, Append and Append To permissions to merge records.
First Time opening Duplicate Manager
When you open Duplicate Manager for the first time and no entities are configured yet, you will be greeted with a welcome prompt that guides you through the initial setup steps.
In the final step, you will be asked whether you want to start with the pre-defined entity configurations for the Account and Contact entities.
These default configurations provide a quick overview of how rules are set up and demonstrate the possibilities within the entity settings.
-
You can always modify these rules and settings later to fit your needs.
-
If you choose not to load the default configurations, you will be prompted to manually select the first entity you want to configure Duplicate Manager for.
Regardless of your choice, you can add or remove entities at any time later through the app.
Manage Entities
Prerequisites
- Security Roles: System Administrator or Duplicate Manager Admin
Configuring a new Entity
To set up a new entity with Duplicate Manager:
- Open the Duplicate Manager App from your app overview.
- Navigate to Entity Configuration via the sidebar
- If no entities are configured yet, you’ll see a welcome popup (refer to [INSERT LINK TO FIRST TIME] for more details).
- In the top panel, click the entity name to open the Entity Select dropdown.
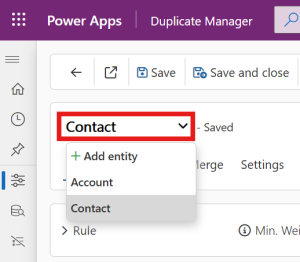
- Click + Add Entity.
- In the popup window, search for and select the entity you want to configure, then press Confirm (✔).
Next, you can add Rules [INSERT LINK TO RULES] or configure the entity’s settings [INSERT LINK TO ENTITY SETTINGS].
Rules
Prerequisites
- Security Roles: System Administrator or Duplicate Manager Admin
- At least one added entity (refer to Manage Entities [INSERT LINK TO MANAGE ENTITIES]).
Adding a Rule
- Open the Duplicate Manager App and navigate to Entity Configuration.
- In the top panel, click the currently selected entity’s name to open the Entity Select Dropdown, and choose the entity you want to configure.
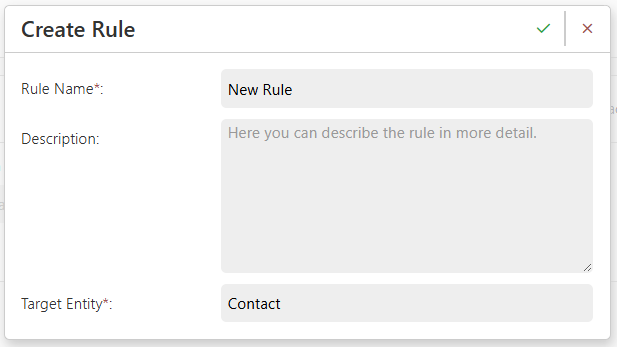
- In the header bar, click + Add Rule.
- In the popup:
- Enter a Rule Name.
- Select the Target Entity you want to compare this entity’s records with.
→ For more information on using a different Target Entity than the Source Entity, see Cross-Entity-Rules [INSERT LINK]. - (Optional) Add a Description to explain the rule’s logic or leave notes for other users.
- Click Confirm (✔) to create the rule.
Don’t Forget to Activate Your Rule!
Configuring a Rule
When you create a new rule, the first column configuration is automatically added. You can then include as many additional columns as needed — combining them to fine-tune how records are compared.
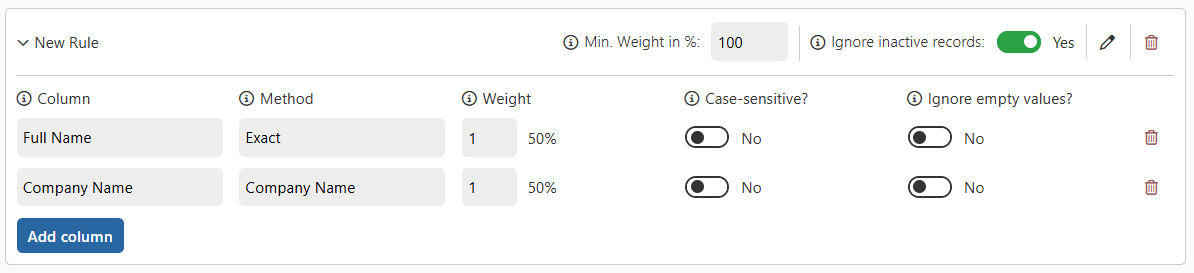
Column Configuration Options
For each column in a rule, the following options are available:
- Column
The field from the source entity that should be compared between records. - Matching Method
Determines how values in the selected column are compared. For example, Exact, Company Name, or Fuzzy.
→ Learn more: Matching Methods [INSERT LINK] - Weight
Assigns a numerical weight to the column, indicating its importance in the overall comparison.
You can adjust these weights to make some fields more significant than others when determining duplicates. - Case-Sensitive?
Determines if comparisons consider letter casing. For example, with case sensitivity enabled, “Contoso” and “contoso” are treated as different. - Ignore Empty Values?
Specifies how empty fields are handled:
Yes: Empty fields are ignored during comparison.
No: Empty fields still contribute to the total match score.
→ See examples: Handling Empty Values [INSERT LINK]
Minimum Weight
Each rule has a Minimum Weight, which defines the combined score that must be reached for two records to be considered potential duplicates.
For example:
- If you want all columns to match before two records are classified as potential duplicates, set each column’s weight to 1 and the rule’s minimum weight to 100%.
- If partial matches are acceptable, you can lower the Minimum Weight accordingly.
→ For more examples, see Rule Weight Examples [INSERT LINK].
Ignore inactive Records
In the rule header, you can also choose to ignore inactive records.
- If set to Yes, only active records are considered in duplicate detection.
- Example: When opening an inactive record, the system will skip this rule, and jobs won’t compare inactive records under this rule.
Cross-Entity-Rules
With Duplicate Manager, you can also create rules where the target entity is different from the source entity. This enables duplicate detection across different entities.
To create a Cross-Entity Rule, simply select the target entity you want to compare records with when creating a new rule. The rule interface will now look slightly different compared to a standard (same-entity) rule:

In this example, the rule is set up from the source entity Contact (1) with the target entity Account (2). In Cross-Entity-Rules, an additional setting called Column in <EntityName> appears (2). This setting defines which column from the target entity (Account) will be compared with the selected column from the source entity (Contact). For instance, here the field Company Name from the Contact entity is compared to the field Account Name from the Account entity.
Examples
In this section, you’ll find examples of different column settings. Click on an item to expand and learn more.
Empty Values
Enabling Ignore Empty Values helps you detect duplicate records even when some fields are missing or incomplete.
However, be cautious — this can increase false positives, flagging records that may not truly be duplicates.
Let’s consider the following two contact records:
| ID | First Name | Last Name | Company |
|---|---|---|---|
| 1 | Austin | Ehrhardt | Contoso |
| 2 | Austin | Ehrhardt |
We want to check if these two records are potential duplicates using a rule with the following setup:
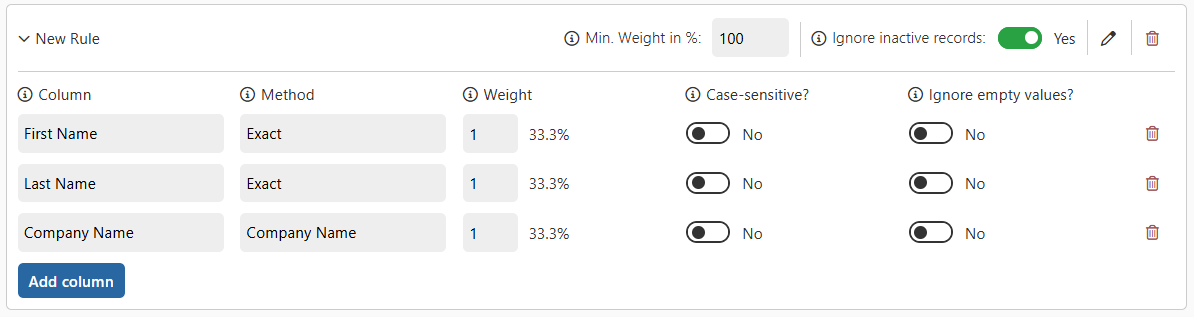
Scenario 1: “Ignore empty values” = No
This one is displayed in the rule screenshot. In this setup, if a column is empty, its weight does not count toward the total weight. In our example:
- First Name → matches → +33.3%
- Last Name → matches → +33.3%
- Company Name → does not match (empty on record 2) → +0%
Total: 66.6%, which is below the 100% minimum → no duplicate detected.
Scenario 2: “Ignore empty values” = Yes (for Company Name)
Now, the column Company Name contributes its weight even when empty. In our example:
- First Name → matches → +33.3%
- Last Name → matches → +33.3%
- Company Name → does not match (empty on record 2), but counts weight → +33.3%
Total: 100%, which meets the minimum → records flagged as potential duplicates.
Rule and Column Weight
Weight determines the importance of each column when comparing records; the higher the weight, the more impact that field has on reaching the match threshold. Adjusting weights allows you to fine-tune which fields are critical and which are less significant for duplicate detection.
Let’s consider the following rule:
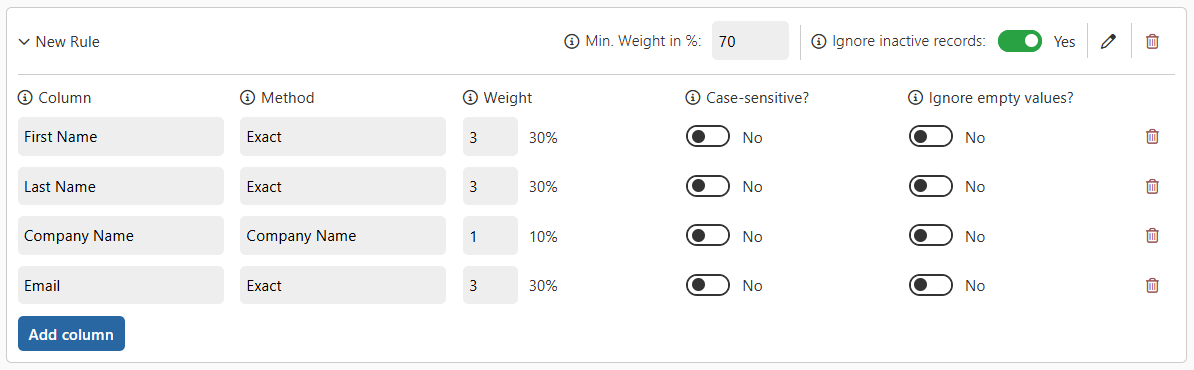
As we can see, to flag two records as potential duplicates, we need a total weight of at least 70%. Several combinations of columns can achieve this threshold:
- First Name + Last Name + Company Name
- First Name + Last Name + Email
- First Name + Email + Company Name
- Last Name + Email + Company Name
- First Name + Last Name + Company Name + Email
Let’s examine two contact records:
| ID | First Name | Last Name | Company Name | |
|---|---|---|---|---|
| 1 | Austin | Ehrhardt | Contoso | a.ehrhardt@contoso.com |
| 2 | Austin | Ehrhardt | Fabrikam | a.ehrhardt@contoso.com |
The weights for the columns are calculated as follows:
- First Name → matches → +30%
- Last Name → matches → +30%
- Company Name → does not match → +0%
- Email → matches → +30%
Total: 90%, which meets the minimum 70% → records flagged as potential duplicates.
Cross-Entity-Rule
Let’s consider the following rule:
As we can see, with this rule, the Company Name field of records in the Contact (1) entity is compared to the Account Name field of records in the Account (2) entity.
Let’s walk through a concrete example with one record from each entity:
| ID | First Name | Last Name | Company Name |
|---|---|---|---|
| 1 | Austin | Ehrhardt | Contoso |
| ID | Account Name | Adress 1: City | Primary Contact |
|---|---|---|---|
| 1 | Contoso | Paris | Austin Erhardt |
When applying our rule, we start with the source entity (Contact).
We look at the value in the configured field Company Name → “Contoso”.
Next, we check the target entity (Account) in the configured field Account Name → “Contoso”.
Since these two values match, the column’s weight is added to the total weight. In this example, the column carries 100% of the weight, so we reach the minimum required threshold.
As a result, the Account record with ID 1 (Contoso) is flagged as a potential duplicate of the Contact record with ID 1 (Austin Ehrhardt).
Duplicate Prevention
Duplicate Manager offers a wide range of settings to customize how duplicate detection behaves within forms.
For each scenario involving forms—such as creating, viewing, or editing records—you can define how and when duplicate detection should be performed.
This article provides an overview of the available configuration options for each scenario.
Prerequisites
- Security Roles: System Administrator or Duplicate Manager Admin
- At least one added entity (refer to Manage Entities [INSERT LINK TO MANAGE ENTITIES]).
Similar Settings
Each scenario (e.g. creating, viewing, or editing records) offers the same three configuration options:
- Show warning when saving/viewing/editing records
Enables or disables duplicate detection and warnings in the respective scenario. - Warning Text
The message displayed to the user when a potential duplicate is detected - Rules to Use
Defines which rules should be applied when searching for duplicates. If multiple rules are selected, a match with any rule will trigger a warning.
At the top of the Creating and Saving Records section, you’ll find the option to synchronize these three settings across all scenarios. When enabled, the values configured for this scenario will automatically be applied to the others as well.
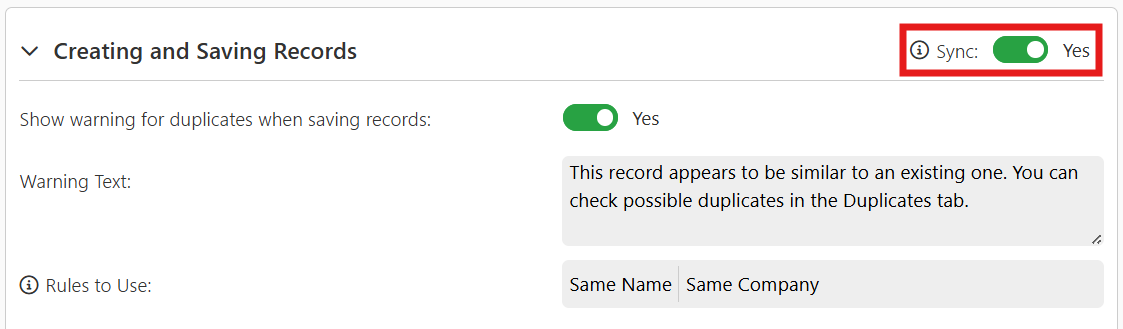
Creating and Saving Records
- Block Creation and Saving of Duplicates
This setting allows you to block users from creating and saving records when Duplicate Manager detects a potential duplicate.
When enabled, if Duplicate Manager identifies a potential duplicate, users will be prevented from saving the record and will receive a warning popup with the custom text defined in the settings.

Viewing Records
- Show warning for duplicates in read-only mode
If a user opens a record that is in read-only mode, duplicate detection will only occur if this setting is set to Yes.
Editing Records
- Perform duplicate search after editing the following fields
Decide whether to perform a duplicate search whenever any field is edited in the form, or only when a field is edited that is part of a rule selected in Rules to Use.
Merge Settings
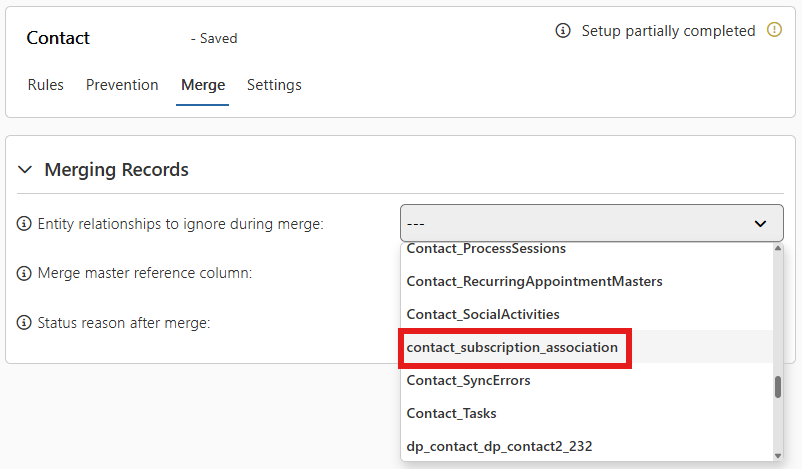
Entity relationships to ignore during merge
When merging records, all related records are reassigned to the selected Master record whenever possible. However, some relationships cannot be reassigned, which may lead to a merge error.
To prevent such errors, you can specify which entity relationships should be ignored during the merge process. These relationships will be skipped when reassigning related records. If a particular relationship does not appear in the selection list, it is already being filtered out and ignored automatically.
If an error occurs during the merge, all changes are rolled back to their original state and an error message will appear, describing what went wrong. To learn how to identify which relationships cause errors, look below.
How to Identify and Ignore Relationships That Cause Merge Errors
When a merge error occurs, follow these steps to resolve the issue by ignoring problematic relationships:
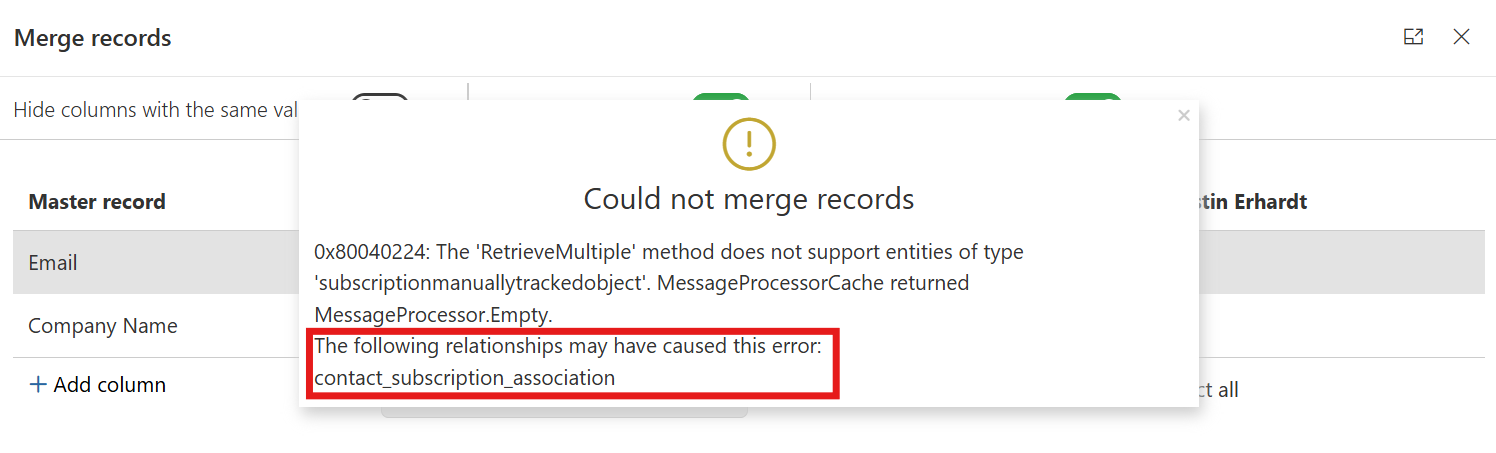
- Review the Error Message
During the merge process, if an error occurs, a warning popup will appear.
Look for the text: “The following relationships may have caused this error” (you may need to scroll down in the popup to see this section). - Identify the Problematic Relationships
Under the mentioned text, you’ll find a list of relationships that could have triggered the error.
Write down or memorize these relationship names. - Open the Duplicate Manager App and open the page Entity Configuration.
- Select the affected entity and navigate to the Merge tab.
- In the section Entity relationships to ignore during merge, find and add the relationships you noted earlier.
- Click Save in the header bar and try merging the same records again.
Merge master reference column
Set a reference column to store the link to the master record.
When merging, all non-master records will have this column populated With a reference to the master record.
This allows you to easily track which records were merged into which master, helping to preserve important relational context and avoid losing traceability of merged data.
Status reason after merge
After a successful merge, all non-master records will be deactivated and assigned a specific status reason.
You can define which status reason should be applied, allowing for better tracking and consistency in your data.
Entity Settings
General
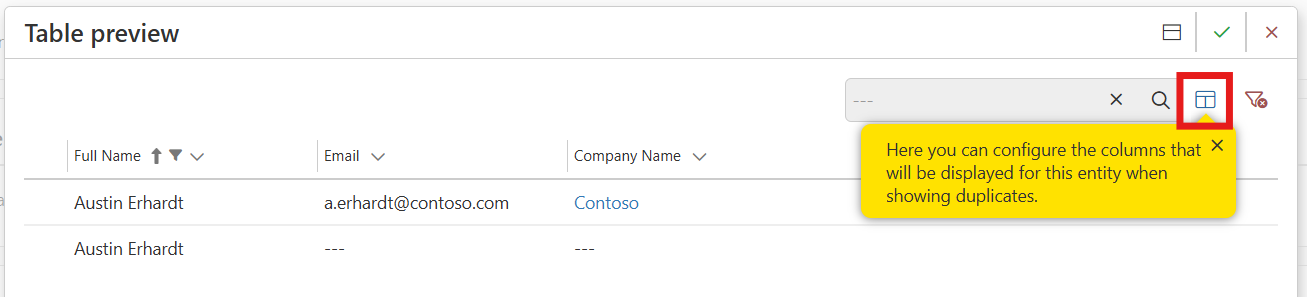
- Default Table View for Entity
Configure the default table view that users will see when viewing duplicates:
-
- Cick Open to launch the Table preview popup.
- Click the Column Select icon to open the column selection panel.
- Add, hide, remove or reorder columns as needed.
- Click Apply to update the preview.
- In the Table preview popup, click confirm (✔) to save your changes.
- Finally, in the Entity Configuration header bar, click Save, or press Ctrl + S on your keyboard.
-
Setup and cleanup
- Trigger entity setup
Manually start the setup process that runs when an entity is configured for the first time.
Use this option if a previous setup attempt failed and you have resolved the issue.
You also need to trigger setup again if you’ve added a new form to this entity, to ensure prevention functions work properly within that form.
- Abort entity setup
Attempt to cancel the currently running entity setup.
This option is only available if a setup process is currently in progress.
- Delete entity configuration
Removes the configuration for this entity and deletes all Duplicate Manager components related to it from your environment.
Use this option to fully uninstall Duplicate Manager without leaving behind residual data.
Deleting the entity configuration will also:- Remove all settings and rules associated with the entity
- Delete all jobs that reference the entity
- Remove ignore flags and reasons from all records previously marked as ignored for this entity — even if you later reconfigure the same entity
Duplicate Manager License
To view your Duplicate Manager license information:
- Open the Duplicate Manager App.
- In the left navigation pane, click License to open the license information page.
Trial License
If there is no active license available for your environment, a trial license will be activated automatically. This allows you to use Duplicate Manager for free with limited functionality. For a detailed overview of what’s included in the trial license, please refer to [INSERT LINK TO TRIAL LICENSE PAGE].
Refresh your License
Your license is automatically refreshed once per day, provided you have a valid Power Automate license. If you’ve recently purchased a Duplicate Manager license and it hasn’t yet been applied to your environment, you can manually update it by clicking Refresh license in the header bar.
The full functionality of your license will become available only after the license has been successfully refreshed.
License Information
At the top of the page, you’ll find the core information related to your license:
- Trial Version
Indicates whether the current license is a trial version. - Expires on
The expiration date of your current license. - Organization ID
The unique ID of your environment. Please include this ID in any communication with our support team. - Most records
Displays the entity with the highest number of records among your configured entities, along with your license’s record limit.
If this entity exceeds the record limit, Duplicate Manager features will not be available for it. However, all other entities below the limit will continue to function as expected.
To regain full functionality for this entity, either upgrade your license or reduce the number of records.
In the Features section, you’ll also see which features are included in your current license and any limitations that may apply.
Matching Methods
Matching methods are algorithms used by Duplicate Manager to compare the values of configured fields and determine potential duplicates.
Matching Method Availability
Depending on the data type of a selected column, some matching methods may not be available. This is because not all algorithms are compatible with all data types.
The table below shows which matching methods are supported for each column type. If a column’s data type is not listed, it means that only the Exact Matching method is supported for that column.
| Column Data Type | Exact | Fuzzy | Company Name | Phone Number | Domain | Starts With | Ends With |
|---|---|---|---|---|---|---|---|
| String | |||||||
| Lookup, Customer, Owner | |||||||
| Integer, Double, Decimal, Money, BigInt | |||||||
| Boolean | |||||||
| DateTime | |||||||
| State, Status | |||||||
| Picklist | |||||||
| File, Image |
Matching Methods Explained
Exact
Exact Matching is very straightforward: it directly compares the values of fields for an exact match without allowing for typos, formatting differences, or partial similarities.
Use Cases
- When comparing names of contacts or accounts where spelling consistency is expected.
- For fields that contain unique identifiers such as IDs, serial numbers, or license plate numbers.
- When validating against standardized values like country codes, ZIP codes, or tax IDs.
Examples
| Value 1 | Contoso |
| Value 2 | Contoso |
| Match? |
| Value 1 | Austin Erhardt |
| Value 2 | Austin Erhard |
| Match? |
Fuzzy
Fuzzy Matching allows for small differences between compared values, such as typos or variations in formatting.
When selecting Fuzzy as the matching method, an additional setting appears for the selected column: Min. Similarity. This lets you define the minimum percentage of similarity two values must have to be considered potential duplicates.
To test how similar two values are, you can use our Fuzzy Matching Similarity Calculator [INSERT LINK].
Use Cases
- Comparing values with slightly different formats.
- Detecting values with possible spelling mistakes.
- Identifying similar but not identical values.
Restrictions
Fuzzy matching is currenlty not supported in forms for the prevention function. Any rule that uses Fuzzy as the matching method will automatically fall back to Exact matching when evaluating for potential duplicates inside a form.
Examples
In this example, full names of contacts are compared allowing for some spelling errors. The Min. Similarity is set to 85%.
| Value 1 | Austin Erhardt |
| Value 2 | Austin Erhard |
| Similarity? | 92.86% |
| Match? |
| Value 1 | Shreya Smith |
| Value 2 | Ben Smith |
| Similarity? | 58.33% |
| Match? |
Company Name
The Company Name matching method ignores common company suffixes and abbreviations (such as Ltd., GmbH, Inc.) when comparing values to detect potential duplicates. A full list of ignored suffixes and abbreviations can be found below.
Use Cases
- Comparing fields that store company or organization names.
- Detecting duplicates where the core company name is the same but includes different legal suffixes.
Examples
| Value 1 | Contoso |
| Value 2 | Contoso Ltd. |
| Match? |
| Value 1 | Contoso Ltd. |
| Value 2 | Contoso Pharmaceuticals |
| Match? |
List of Ignored Suffixes and Abbrevations
&
+
A/S.
A/S
ADMIN
ADMINISTRATOR
AG
AG.
AND
ASSOCIATION
ASSOCIATION.
B.V.
BANK
BANK.
BEDRIJF
BEDRIJF.
BOARD
BOARD.
BV
BV.
C.V.
CCC
CCC.
CENTER
CO
CO.
COM
COMPANY
COMPANY.
CORP
CORP.
CORPORATION
CORPORATION.
CV
CV.
CYF
CYF.
DE
E.G.
E.K
E.K.
E.V
E.V.
EEIG
EEIG.
EG
EG.
EI
EI.
EK
EK.
EV
EV.
FOUNDATION
FOUNDATION
FOUNDATION.
G.M.B.H
G.M.B.H.
GBR
GBR.
GGMBH
GGMBH.
GMBH
GMBH.
GROUP
HOSPITAL
IE
IE.
INC
INC.
INCORPORATED
INCORPORATED.
KG
KG.
KGAA
KGAA.
LC.
LIABILITY
LIABILITY.
LIMITED
LIMITED.
LLC
LLC.
LLLP
LLLP.
LLP
LLP.
LP
LP.
LTD
LTD.
LTDA
LTDA.
MBH
MBH.
MEDICAL
N.V.
NET
NV
NV.
OF
OHG
OHG.
ORG.
ORGANISATION
ORGANISATION.
PARTG
PARTG.
PLC
PLC.
PLLC
PLLC.
PTY
PTY.
RU
S.A.
S.A.D
S.A.D.
S.A.R.L
S.A.R.L.
S.C.
S.L.L.
S.R.L.
SA
SA.
SAD
SAD.
SALESFORCE
SAPA
SAPA.
SARL
SARL.
SAS
SAS.
SC
SC.
SCE
SCE.
SCHOOL
SE
SE.
SLL
SLL.
SPE
SPE.
SRL
SRL.
STICHTING
STICHTING.
STIFTUNG
STIFTUNG.
UG
UG.
UND
UNIVERSITY
V.O.F.
VEREIN
VEREIN.
VOF
VOF.
VVAG
VVAG.
W.V
W.V.
WV
WV.
Phone Number
The Phone Number matching method allows Duplicate Manager to identify duplicates even when phone numbers are stored in different formats. All non-numeric characters are ignored, and country codes or extensions are normalized to enable effective comparison.
Use Cases
Compare fields that store telephone numbers in various formats, for example:
- One number includes the country code, another doesn’t.
- Numbers use different separators (spaces, dashes, parentheses).
- One number includes an extension.
Examples
| Value 1 | +18005550100 |
| Value 2 | 001 800-555-0100 |
| Value 3 | (800) 555-0100 |
| Value 4 | (800) 555 – 0100 ext. 4 |
| Value 5 | +1 800 555 0100, extension 5 |
| Value 6 | +1 800 555 0100 #6 |
| Value 7 | tel: +1-800-555-0100 |
| Match? |
| Value 1 | 001 800-555-0100 |
| Value 2 | 001 800-555-0200 |
| Match? |
Domain
The Domain matching method compares URLs or email addresses based on their domain part only, ignoring the rest of the address. This helps identify duplicates even if subdomains or specific paths differ.
Use Cases
- Comparing email addresses to detect duplicates from the same organization.
- Comparing website URLs where only the main domain should be considered.
- Identifying records that belong to the same company or entity based on their domain.
Examples
| Value 1 | contoso.com |
| Value 2 | www.contoso.com |
| Value 3 | http://www.contoso.com |
| Value 4 | https://www.contoso.com |
| Value 5 | https://contoso.com |
| Value 6 | https://www.contoso.com/university |
| Value 7 | https://contoso.com/university/apply |
| Match? |
| Value 1 | a.erhardt@contoso.com |
| Value 2 | austin.erhardt@contoso.com |
| Value 3 | s.smith@contoso.com |
| Value 4 | support@contoso.com |
| Match? |
| Value 1 | a.erhardt@contoso.com |
| Value 2 | a.erhardt@contoso.de |
| Match? |
Starts with
The Starts with matching method compares only the beginning of a field value based on a specified number of characters. If a value contains fewer characters than the configured threshold, it will not match.
Use Cases
-
Finding values that follow a consistent prefix or strucutre at the start.
Examples
In the following examples, the first 7 characters of each field value are compared.
| Value 1 | Contoso |
| Value 2 | Contoso Bank |
| Value 3 | Contoso Pharmaceuticals |
| Match? |
| Value 1 | Contoso |
| Value 2 | Conto |
| Match? |
Ends with
The Ends with matching method compares only the ending of a field value based on a specified number of characters. If a value contains fewer characters than the configured threshold, it will not match.
Use Cases
- Identifying records with common suffixes or endings (e.g., file extensions, product codes).
- Matching values where the relevant information is at the end of the string (e.g., license plate numbers, serial numbers).
- Detecting duplicates in fields with variable prefixes but consistent endings.
Examples
In the following examples, the last 6 characters of each field value are compared.
| Value 1 | invoice-202105 |
| Value 2 | order-202105 |
| Match? |
| Value 1 | XYZ-123456 |
| Value 2 | XYZ-12345 |
| Match? |
Fuzzy Matching Similarity Calculator
Use this tool to test the similarity between two values and gain a better understanding of how to configure the Min. Similarity setting effectively for Fuzzy Matching.
Jobs
Prerequisites
- Security Roles: System Administrator or Duplicate Manager Admin
Overview
On this page, you can view all previously created jobs and monitor their status, current step in the duplicate detection process, method used, and more.
To see detailed information about a job, right-click the job and select Job Info, or select a job and click the Job Info button in the header bar.
Creating a Job
- Open the Duplicate Manager App.
- In the left navigation pane, select Jobs to navigate to the Jobs page.
- In the header bar, click on + Create Job.
- In the popup, enter a name for the Job you want to create and optionally provide a Description.
- Select the source Entity you want to detect duplicates from.
- Select all Rules you want to apply for this Job. If any selected rule flags a potential duplicate, it will be shown in the results.
- Finally, select the Processing Method.
For details on processing methods, refer to [INSERT LINK TO PROCESSING METHODS]. - Click Confirm (✔) to create the job.
If you chose the Dataverse Processing Method, the Job will start automatically. If you selected Desktop, see [INSERT LINK TO RUNNING A JOB WITH DESKTOP APP] for instructions on how to run the Job.
Processing Methods
Duplicate Manager offers different methods to run your Jobs, tailored to your specific requirements and situation. Due to technical limitations within the Dataverse Platform—especially when searching through all records of an entity—some jobs may not be executable directly and automatically inside the Dataverse environment. This depends on factors like the number of records in the entity and the complexity of certain matching algorithms.
This section explains the benefits and restrictions of each processing method available, helping you decide which method is best suited for your scenario.
Dataverse
This method processes the job automatically within the Dataverse environment.
Benefits
- Easy to use: No need to install or use the external application.
- Convenient: Fully integrated into the Dynamics & Power Apps experience.
- Fast: Ideal for entities with a low number of records and simple matching rules (e.g., Exact Match, Starts With).
Restrictions
- 2-minute runtime limit: Microsoft enforces a strict execution limit of 2 minutes. Jobs that require longer processing time due to high record count or complex matching (e.g. fuzzy matching) will fail.
- Record and algorithm limitations:
- If the combined number of records across all entities that the job needs to search (based on the selected rules) exceeds 250,000, or if fuzzy matching is used and the total exceeds 10,000 records, you will be prompted to confirm that the job may fail.
- This method is not available if:
- the total number of records exceeds 750,000, or
- fuzzy matching is used and the total exceeds 20,000 records
- These hard limits exist because jobs of this scale almost always fail within Dataverse due to the time constraint.
- Retry possible: Failed jobs can be rerun with the same or adjusted settings via the Rerun option in the header bar or context menu, including the possibility to switch the processing method.
Desktop
This method uses the Duplicate Manager Desktop App in order to process jobs. You can learn more about it here [INSERT LINK TO DUPLICATE MANAGER DESKTOP APP]. It is the most powerful processing method and comes with significantly fewer restrictions than the Power Apps processing method.
Benefits
- Can handle any number of records and all matching methods without limitations.
- Ideal for large-scale and complex duplicate detection scenarios.
Restrictions
- Requires you to download and run the Duplicate Manager Desktop App.
- Performance depends on your local system and network speed.
Rerunning a Job
The Rerun functionality allows you to quickly run a previously created job again. To rerun a job, simply select it from the list and click Rerun in the header bar or context menu.
The job creation popup will open with all the original settings pre-filled. If you don’t want to make any changes, just press Confirm (✔) to create and start the same job again.
The original job and its results will remain unchanged and won’t be lost.
Viewing Job Results
Once a job is completed, you can open its results to review all detected duplicate records. To open a job, either double-click it in the list or select it and click Open in the header bar or context menu.
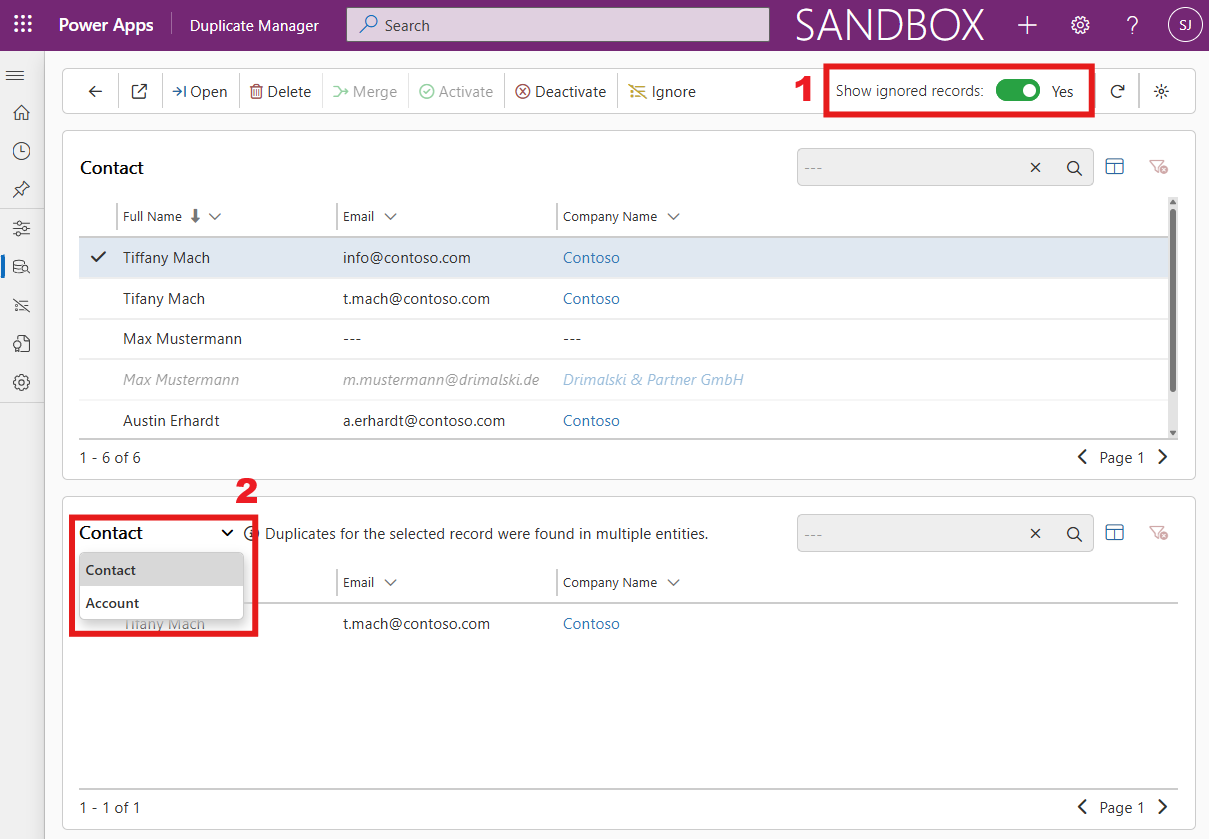
In the job results view, click any record in the upper list to display its potential duplicates in the lower section of the page. If the selected record has matches across different entities, a hint will appear in the lower table. You can then toggle between entities by clicking the entity names to switch the view accordingly (marked as 2 in the image below).
Show ignored records
At the top right, you can toggle between hiding ignored records and including them in the list (marked as 1 in the image below). Records that match with ignored records will only appear when this setting is set to Yes, even if those records themselves are not ignored. Ignored records will be shown in cursive and slightly transparent, as displayed in the picture below.
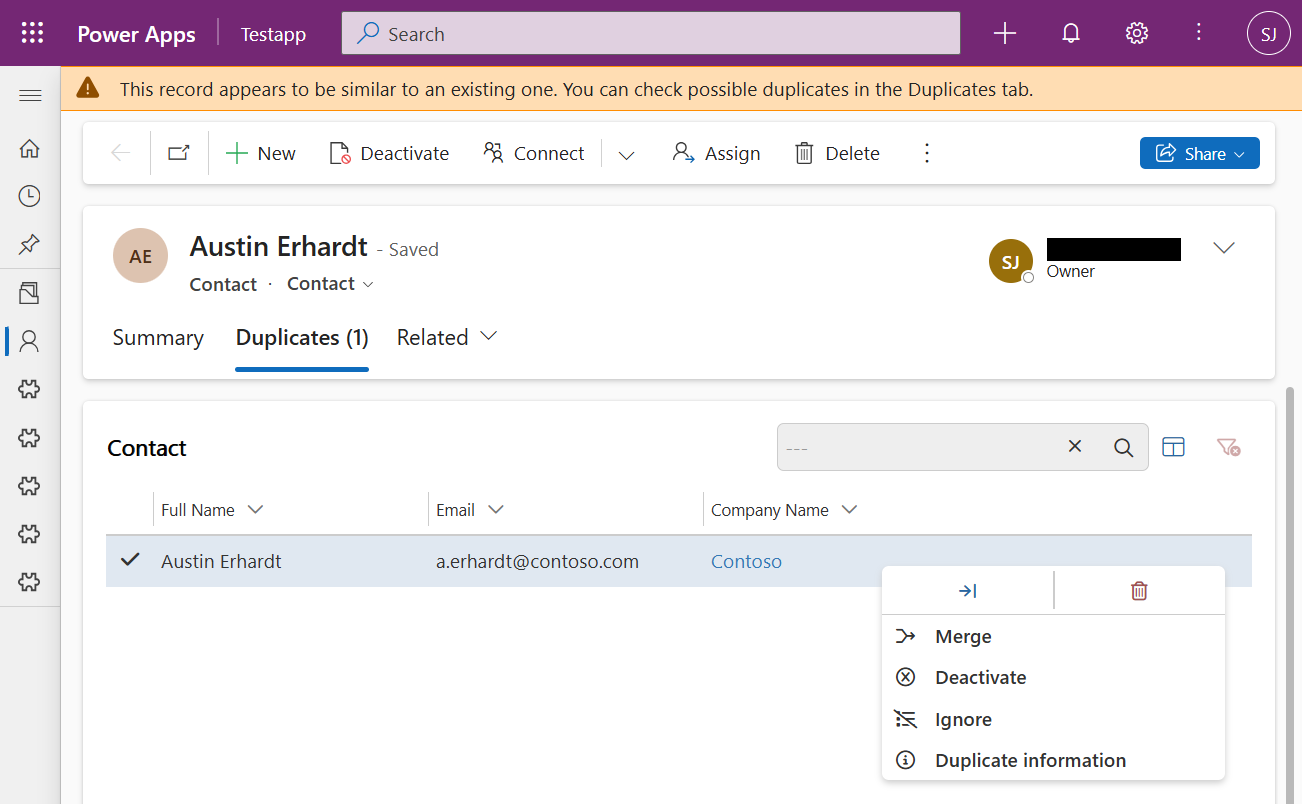
Manage your Duplicates
Now you can manage your duplicates with the following actions:
- Open Records
View more details about the selected records to better understand the context. - Delete Records
Permanently remove selected records from your environment. - Merge Records
Combine records to avoid data loss and maintain clean, accurate data. [INSERT LINK TO MERGE RECORDS] - Activate or Deactivate Records
Change the status of selected records. (One option may be unavailable if all selected records are already active or inactive.) - Ignore Records
Prevent selected records from being flagged as duplicates in future detections—ideal for intentional duplicates. [INSERT LINK TO IGNORE RECORDS] - View Duplicate Information
Understand why a record was flagged by reviewing which rules caused it to be identified as a potential duplicate.
Ignore Records
Viewing Ignored Records
To view all ignored records:
- Open the Duplicate Manager App.
- In the left side bar, navigate to Ignored Records.
- In the entity selector at the top left, choose the entity for which you want to see ignored records.
- The list will now display all records of the selected entity, including whether they are ignored in Jobs, Forms, and their Ignore Reason.
Ignoring records
You can ignore records in several ways:
- From the Ignored Records page in the Duplicate Manager App
- Directly in Job Results
- While viewing duplicates of a record inside a form
Via the Duplicate Manager App
- Open the Duplicate Manager App and navigate to the Ignored Records page.
- In the header bar, click + Add Record.
- In the popup, use the Entity Selector (top left) to choose the entity you want to ignore records from.
- Use filters and search to find the records you want to ignore, and select them.
- You can select multiple records to apply ignore status to all of them at once.
- Right-click a selected record to open the context menu, and click + Ignore Records.
- In the popup, choose whether to ignore the records in Jobs, Forms, and optionally add an Ignore Reason.
- Click Confirm (✔) to ignore the selected records.
When Viewing Job Results
- In either the top or bottom table, select the records you want to ignore.
- In the header bar or via the context menu, click Ignore.
- Continue from Step 6 in Via the Duplicate Manager App.
When Viewing Duplicates Inside a Form
- Select the records you want to ignore.
- Right-click a selected record and choose Ignore from the context menu.
- Continue from Step 6 in Via the Duplicate Manager App.
Editing Ignore Status
To edit the ignore status of one or more records:
- Select the desired records in the list.
(You can select multiple records to update their ignore status at once.) - In the header bar or by right-clicking the selected records, click Edit.
- In the edit menu, choose whether to ignore the selected records in Jobs, Forms, and optionally provide an Ignore Reason.
- When finished, click Confirm (✔) to save your changes.
Duplicate Manager Settings
Currently, this page includes only user-specific settings.
User Settings
Here you can adjust your user-specific settings. Changes made here apply only to your user account and do not affect other users.
- Dark Mode: Toggle between the light and dark theme.
You can also quickly switch modes from the top right of the header bar on any page within Duplicate Manager. - Show Hints: Enable or disable helpful hints for certain features that may not be immediately obvious.
Merge Records
Prerequisites
- Any security role that allows grants Read, Write, Append and Append To permissions for the entity to merge records.
Merging Records
You can merge records when viewing:
- Job results
- Ignored records
- Duplicates of a record inside forms
Steps:
- Select the records you want to merge.
- In the header bar or by right-clicking the selection and opening the context menu, click Merge.
The merge popup will open.
Overview
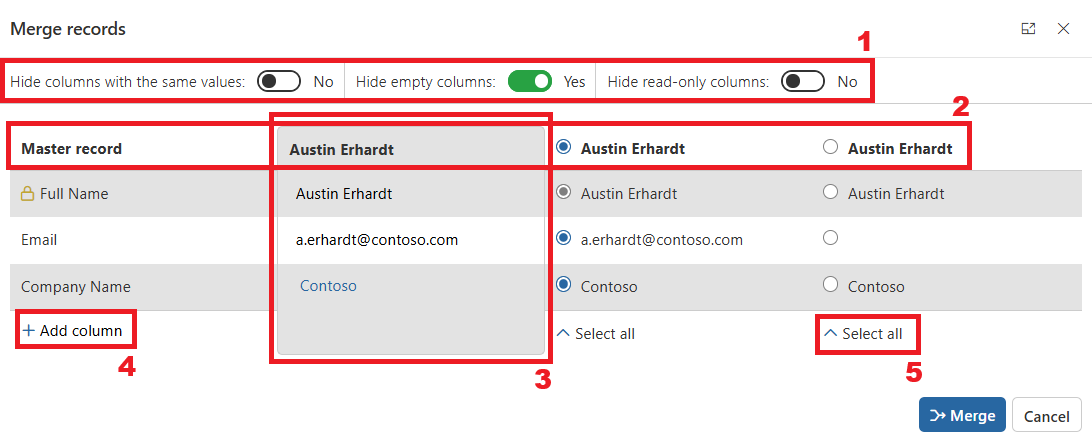
1 - Column Visibility Options
You can toggle display settings to show or hide columns, which affects both the merge preview and the Add column selector:
- Hide columns with the same values: Hides/shows all columns where all selected records share the same value.
- Hide empty columns: Hides/shows columns that have no value in any selected record.
- Hide read-only columns: Hides/shows read-only columns (indicated by the icon). These cannot be changed during merge.
2 - Master Record Row
Choose the master record—the primary record that remains after merging. All other records will be deactivated and their status set according to the entity’s Merge Settings [INSERT LINK TO MERGE SETTINGS]. Related records from non-master records will be reassigned to the master, except those explicitly excluded by the Merge Settings [INSERT LINK TO MERGE SETTINGS].
3 - Preview
Displays the final values for each column in the master record after merge completion. You can:
- Select a value from any of the records for each column
- Manually edit the value directly in the preview
4 - Add or Remove Columns
- To add a column: Click Add column and select a column from the list (hidden columns per your display settings won’t appear).
- To remove a column: Hover over its name and click the x icon. Note: Removing a column means its data will not be included in the resulting master record.
5 - Select all
Use this option to automatically set the master record’s values to those of the selected record.
Finalizing the Merge
- When ready, click Merge in the bottom right corner.
- Depending on the number of records and entity relationships, merging may take up to 2 minutes.
- You can close the merge window before completion, but no notification will be provided if the merge fails.
Troubleshooting
If the merge fails, refer to [INSERT LINK TO RESOLVING MERGE ISSUES]
Duplicate Manager Desktop
Duplicate Manager Desktop is an application that can be installen on any laptop or computer running windows. It can be installed either on the same machine where you use Power Apps, or a different machine.
Use Duplicate Manager Desktop to process jobs using the power of your local device. It processes all data on your local machine and returns the results to Power Apps.
System Requirements